Custom risk types
🏥
Custom risk types
Brainframe comes with multiple pre-configured risk types as explained in the Risk management module. Each of them can be overridden by creating the same risk type name, or you can create additional risk types that only exist in your workspace.
This can be done from the Workspace settings page and only by administrators
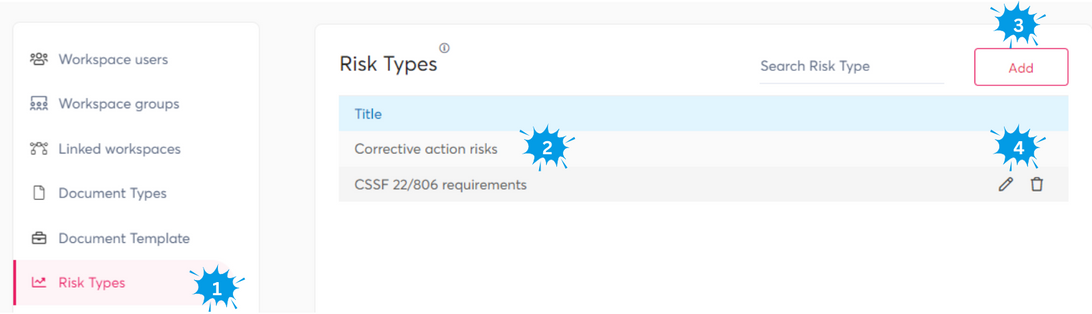
- Select the risk types menu in the settings page
- This is a list of custom risk type names you created or have overridden
- Click here to add new risk types (see below for more details)
- After hovering over a risk type you can edit or delete the risk type
Configuring risks
When you add new risks types you can fully configure how you want them to behave:

- The risk type name (if you want to override default risk types, you can copy the exact name)
- Select the risk matrix scale (Let us know if you need other matrix scales)
- 3x3
- 4x4
- 5x5
- 10x10
- Configure the risk appetite colors
- The Min column, indicates as of which risk that specific appetite color should be shown
- The review frequency allows you to configure as of when a new risk review will be required (if not done in time, the risk will flash on the risk matrix view)
- Here you can describe the methodology users should apply when doing new risk readings. It would typically include ranges on when to use which values for each measure the user can fill in
- This checkbox replaces the standard 6 "Remaining work" statuses with the stages of the Checklist's Kanban as explained in the process workbench. Once this is enabled, dragging a card on the Kanban to another stage will consider the stage change as a "Remaining work" change, and ask you if we should do a new risk reading on the document
- Risks are always calculated based on multiple "measures". By clicking "Add measure", you will see extra measures below that can be used in the formula
- These are the measures added from the previous step. You can rename them according to your needs (e.g. confidentiality, integrity, availability, probability, ...)
- Our qualitative risk matrix has an X axis (Impact) and Y axis (Probability). Here you can define how the different measures from step 5 will be used to calculate X and Y with following options for its value
- "Value" will take the exact value provided by the user for the measure
- "Min" will take the lowest value provided by the user for the one or more measures
- "Max" will take the highest value provided by the user for the one or more measures (E.g. max of confidentiality, integrity and availability to calculate impact)
- You can define which document properties are mandatory or optional during the risk reading. As shown on risk management documentation, these will be automatically filled in if already present on the document for which a reading is being done, or asked during the reading.