
Requirement/Maturity mapping (SOA)
A key objective of an ISMS/GRC/QMS management system is to comply with a specific standard or regulation requirements. These are often published in documents provided by the regulator or standardisation organization, and can be hard to map to the work you are actually doing.
The challenge during audits and daily management is to get a clear overview on whether you comply with all requirements, track open tasks from internal/external audits, collect evidences for specific requirements and track the maturity on different controls. This is why we made the SOA module (Statement of applicability), allowing you to create/import requirements and link your documents to the different requirements so you quickly find them back when you need them.
The SOA module is only accessible to admin users, and is not folder hierarchy aware.
Creating a SOA
From inside the SOA module you can click "Add SOA" to create a new standard/regulation mapping.

- The name of the standard/regulation (e.g. ISO/IEC ISO27001:2022)
- An optional description giving other users a better understand why/how this applies
- An optional URL linking to a public description which will be available from the SOA screen later on
- An optional upload of related standard/regulation documents that have been purchased, so they can be used as guidance from the SOA screen later on
On the next screen you can decide how to build your SOA (Self configured, Template or Import Excel) which is described more in detail below
Self configured
Here you will be able to manually configure the different categories and requirements.

- Select the "Self configured" setup mode
- Type the name of your different categories of requirements (you can drag/drop them to change the order)
- Here you can remove a category
- Add new categories
Once you did this, you start with an empty SOA that looks as following:
![]()
- Here you'll find quick access to the URLs and PDFs you uploaded during the creation of the SOA
- This is the SOA action menu
- Create a new SOA
- Edit the current SOA (opens screen similar to the create SOA and allows you to modify the SOA description/guidance document/categories)
- Delete the SOA (all requirement maturity and linked documents will be lost, documents themselves will remain in the original folder)
- Print simple SOA - Prints a list of all categories and requirements, with their applicability, requirement identifier and name, linked control names and names of evidence documents
- Print detailed SOA - Prints the same information as the simple SOA, but adds the different radar graphs and related risks per requirement.
- Export SOA - Exports the requirement identifier, name, description, status, linked control names, evidence names and related risk names into an excel (this can be imported using the "Import Excel" SOA creation option as described below)
- This area is empty until you add actual documents
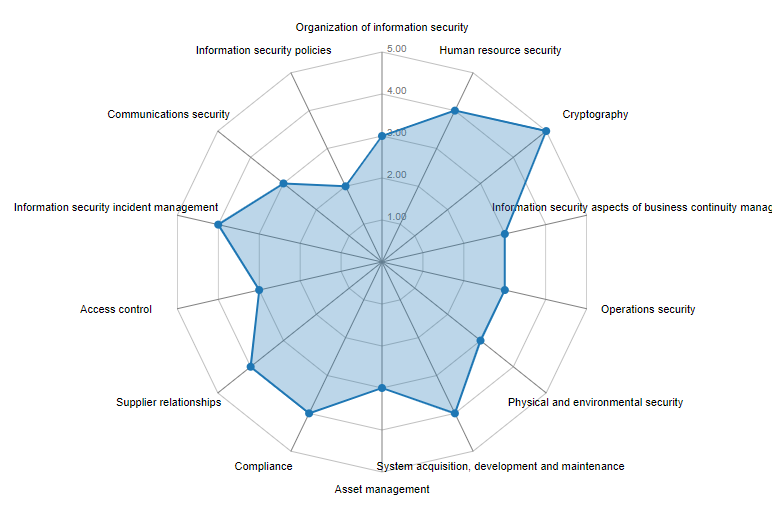
- Maturity per SOA category - Will show a radar chart with the different maturities per category
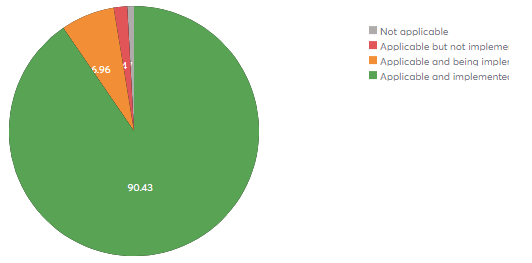
- Applicability overview - Shows counts on how many of the requirements are applicable and implemented
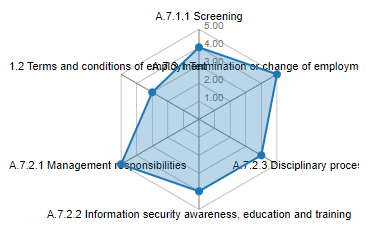
- Categories, requirements and applicability - This is where all the SOA categories with their individual requirements will be listed (empty at the start). Per category you'll see a radar graph of the maturity for the requirements in that category
- Maturity per SOA category - Will show a radar chart with the different maturities per category
- By clicking "Add requirement", you can manually add new requirements from your standard/regulation to the category (this is described in more detail below)
- Here you can edit or delete the whole category (all requirements, their maturity and linked documents for this category will be lost, the documents themselves will remain in the folders)
Template
When selecting this option you will be able to select pre-configured templates of "Categories" and their "Requirements". Simply select the template and click save
Import Excel
This option opens a screen similar to the bulk document import screen, allowing you to download a template that can be filled in as per your needs, or allows you to import an Excel from a previous export as explained in (2) above
ATTENTION
Linked controls, evidences, risks and requirement notes are not imported from an export
Adding & editing requirements
When you click the "Add requirement" or edit icon, you can configure your requirements

- This is an optional identifier/prefix of the requirement (e.g. "A.5.1")
- This is the title of the requirement (e.g. "Policies for information security")
- Here you can describe the requirement and put additional guidance on implementation (e.g. recommendations from ISO27002)
- All requirements will have one of the following maturity stages that will be represented in the radar/overview graphs
- Not applicable
- Applicable but not implemented
- Applicable and implemented - DEFINED
- Applicable and implemented - MANAGED
- Applicable and implemented - OPTIMIZED
- Here you can type the title or identifier of existing documents (e.g. policy/procedure/...) in your workspace that acts as a control for this requirement
- Here you can type the title or identifier of existing evidence documents in your workspace that acts as evidence for this requirement
- Here you can type the title or identifier of existing risk documents in your workspace that justifies the selection of applicability of this requirement based on a risk
- Here you can quickly change the requirement to another category in the same SOA
- The same requirement can be linked to multiple SOAs at the same time, allowing you to update them only once (e.g. privacy elements for GDPR and ISO27001). When clicking this button you'll be asked to select the target SOA and category to link to. When removing a requirement that is in multiple SOAs, it will only be removed in one SOA at a time and details will not be lost
Managing requirements
Each requirement of a SOA allows you track their maturity and link to individual documents from your workspace (controls, evidences and related risks). You can directly plan actions using the tasks module integration to keep track of your work in an organized way.
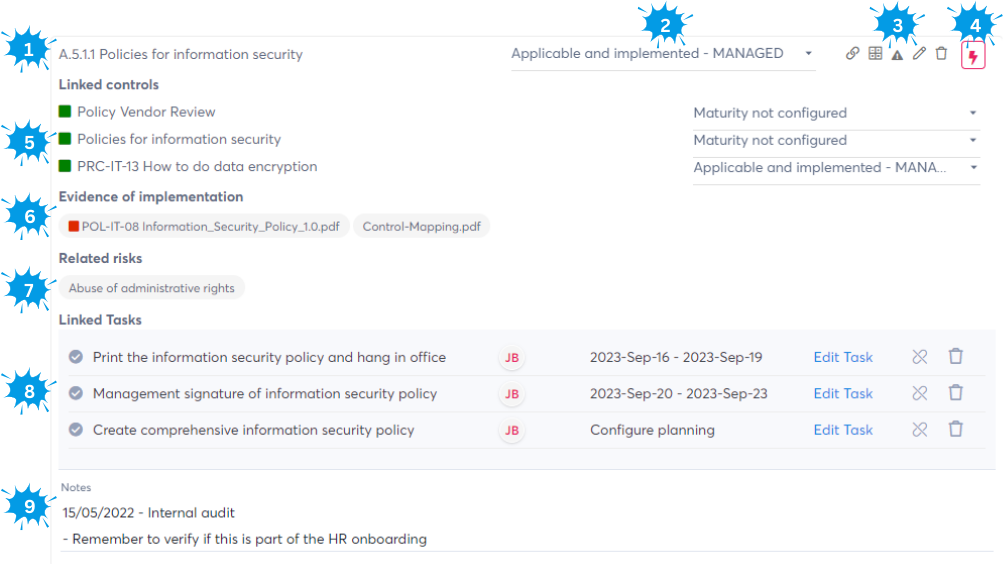
- The identifier/prefix and title of the requirement (when hovering over here you'll see the description/guidelines for implementation if configured)
- Here you define your evaluation of the requirement which will be used in the radar graphs
- Action buttons
- Link control document
- Link evidence of implementation document
- Add related risk
- Edit the requirement (opens screen described in previous topic)
- Delete requirement (attention, the requirement maturity, notes and links to controls/evidences/risks will be lost)
- Add general task - Opens the new task menu similar to how you add tasks on normal documents. These tasks will be added in (8) and will also be visible in the Tasks management module with a link to the current SOA
- List of all linked control documents. If the document type is configured to track maturity (e.g. default for policies and procedures), you will see and be able to modify their maturity on the right
- List of all linked evidence documents
- List of all related risks
- List of all tasks linked to this requirement. You can click the checkbox to change the status, modify the assigned people and deadlines while also opening the detailed task screen by clicking "Edit task". Using the unlink button the task will remain in the tasks module, but will be removed from this requirement while the delete button also removes the actual task.
- This is a free field where you can put related notes (e.g. from during an auditor or ideas to improve)