Document distribution
Welcome to the Document Distribution Module of Brainframe. This module has been developed to enhance the efficiency, security, and compliance of your organization’s document management processes. It serves as a cornerstone for digitally distributing approved documents, such as policies, procedures, and other critical information, to your staff and suppliers.
The primary objective of this module is to streamline the distribution of essential documents within your organization and to external partners. By leveraging this module, you can ensure that all relevant parties have easy and secure access to the latest versions of vital documents. This not only boosts compliance and awareness but also strengthens the overall information security posture of your organization.
Creating a distribution
Look at a distribution as a set of documents that serve a common purpose. Companies create distributions for anything that makes sense to them. We often see distributions like "Policies", "Procedures", "Company induction", "Security & Privacy training" or "Legal documents for customers" with different objectives and potentially different audiences.
Only administrators can see distributions in the modules section. When opening the module and clicking "Add distribution"
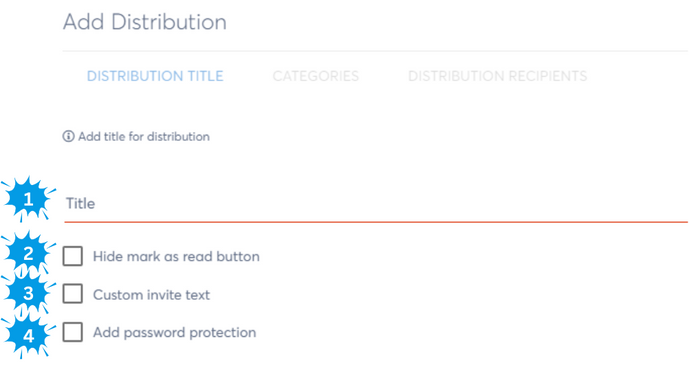
- The title of your distribution (e.g. Policies)
- For some distributions you are required to collect auditable evidence of when documents have been read and approved (e.g. policies), while others don't necessarily need this (e.g. procedures)
- When you are sending out distributions to external contacts (e.g. employees), we will use a simple standard text by default. By checking this box you can provide additional guidance in the mail being sent
- By default distributions can simply be access using the provided link. For certain sensitive distributions (e.g. auditor evidence collection) you might want to protect the link with a password and send the password through another way (e.g. sms)
On the next screen you'll be able to define different categories to group your documents (e.g. first an introduction with additional guidance on how the company expects employees to handle policies, and then a second category with the actual policies:
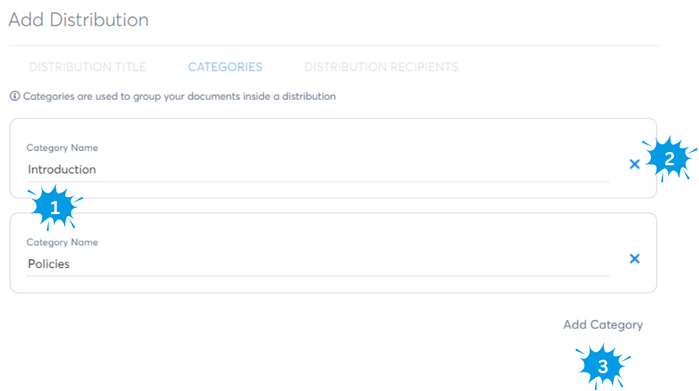
- Two different categories
- You can remove a category (all linked documents will be unlinked (not removed) from the distribution if you are in EDIT mode
- Here you can add different categories
TIP
You can simply drag/drop the categories to change the order
On the next screen you'll be able to define who from the external contacts need to be added to this distribution:

- In this dropdown you can select individual people from the external contacts
- Here you can quickly select multiple contacts based on their Tags
- Here you can exclude contacts with a specific tag from the previous selectsion
TIP
The distribution recipients can also be left empty and filled in later
Once you save the distribution, it will be added to your Distributions dashboard
Assigning documents to distributions
Any document from your workspace, including Word, Excel, PowerPoint or video (e.g. Youtube captures) can be added to your distribution to guide your contacts in a perfect understanding.
To add documents, you click on the three dots on the right of a document, and you click on the Add to icon and then "Add to distribution":
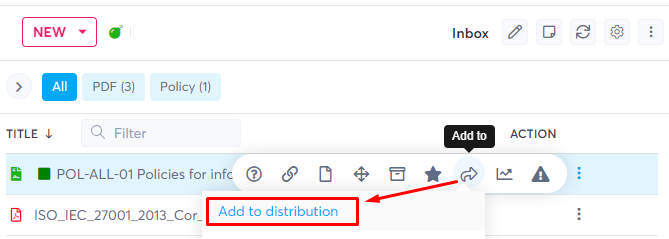
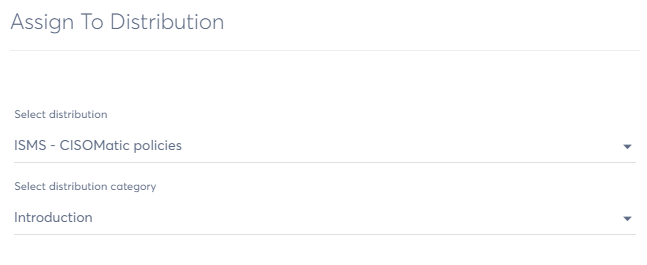
This will open a screen where you can select an existing distribution and the category where you want the document to appear:
Overview on distribution
Once you added multiple documents to a distribution, and open the Distribution via the Distributions module, you will see a screen similar to this
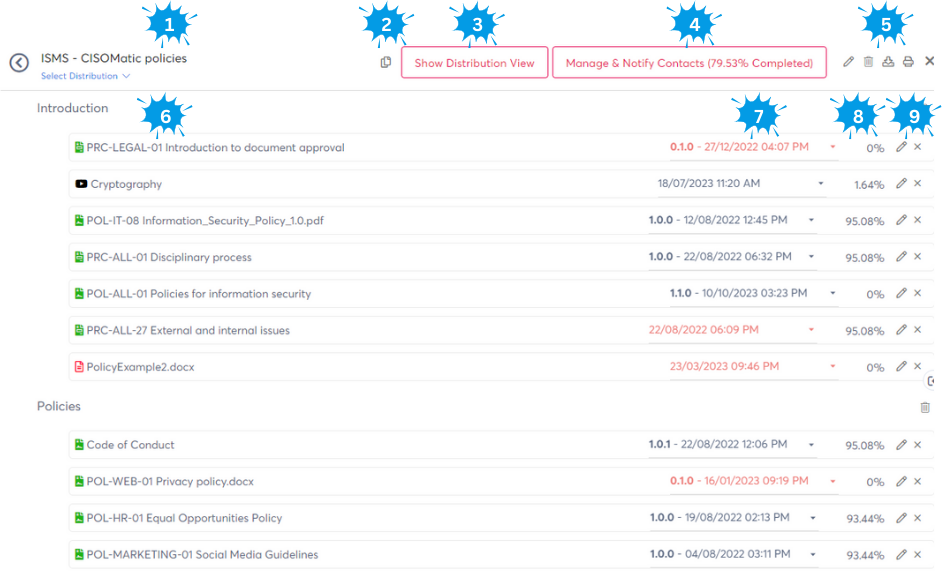
- The name of the distribution with the ability to quickly switch between distributions
- A copy icon that put the general URL of the distribution in memory (e.g. to make the distribution available from a link in your intranet/website)
- This button opens the link from point 2 showing you how it will look for external contacts
- This button show the % of acceptance for all assigned contacts in case the distribution was configured to track the approvals. By clicking on the button it opens the "Manage & notify contacts screen" that is described in more detail below
- These action buttons have following functions
- The edit button allows you to modify the current distribution using to the same screen previously shown when adding a distribution
- The bin button completely removes the distribution, including all tracked progress on the documents (the documents themselves are not removed and remain in their original folders)
- The download attachment button downloads all documents that can not be printed (e.g. Word, Excel, PowerPoint, Zip, PDF and other files)
- The print button structures the whole distribution in one document with a clickable index at the top. The order of the documents is based on the category and order of document you specified, giving you one single document to share with auditors etc (e.g. print to PDF, which you can then open/import into Word to make additional modifications)
- The list of documents titles for which you can can the order by drag/dropping them. (dragging to another category is currently not possible, so you need to remove/add them)
- The document version used in this distribution with versions indicated in red that are not on the latest available version of the document. This allows you to work on newer version, while keeping your audience on a specific older version until you are ready to share it with them
- This column is only visible for distributions that did not enable the "Hide the mark as read" checkbox. It shows the percentage of acceptance for this specific document for all contacts assigned to this distribution. By clicking on the % you can see more details about who already marked it as read
- Clicking the edit button acts similar to clicking on the document name, and opens the document in a popup screen. Clicking the bin button removes the document from the current distribution (without touching the actual document)
Notice
You can also add YouTube videos using the Website Snapshot tool that you can then add to distributions and use for training purposes
Manage & Notify contacts
To invite your external contacts (e.g. employees) you can click on the "Manage & Notify contacts" (4) button shown above. On this screen you can track the overall progress of acceptance on all documents per contact. Here you can also quickly add other external contacts (left) to the current distribution (right) and send them an invite per mail. External contacts don't need to log in, and the link sent per email will be sufficient to access the distribution content (optionally a general password can be configured per distribution)
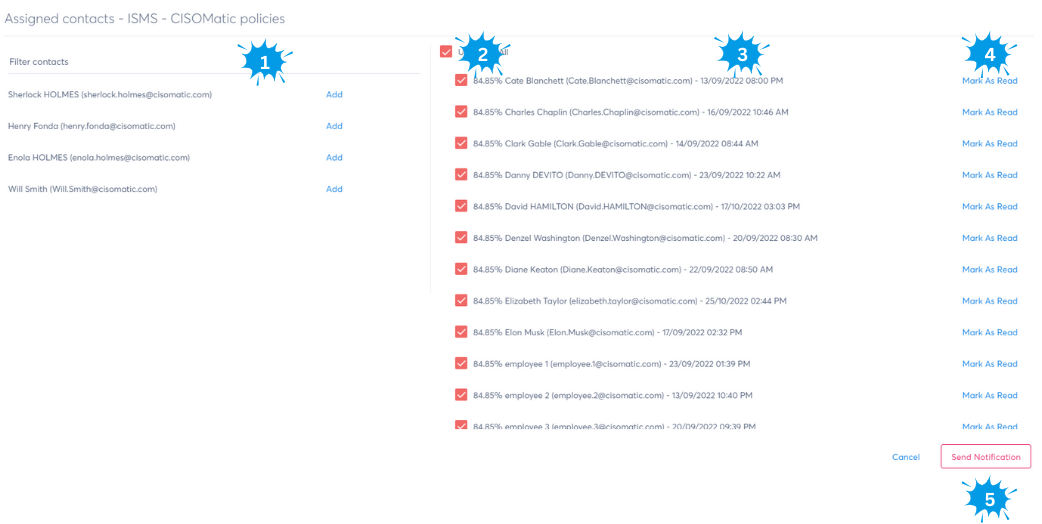
- List of external contacts that are not yet part of the current distribution. By clicking Add they will move to the list on the right of the screen
- Here you can check the external contacts you'll send a notification to, while seeing how much % of all documents they have already marked as read
- The date indicates the latest "marked as read" action per user from the distribution. If the "Mark as read" is clicked by the administrator, it will indicate as such
- This button is intended if for some reason you still want to distribute documents physically or through another system, but still track inside Brainframe when they have been approved
- By clicking the "Send notification" button, all checked external contacts will receive an email with an invitation to look at the distribution (you can optionally modify the text on the distribution)
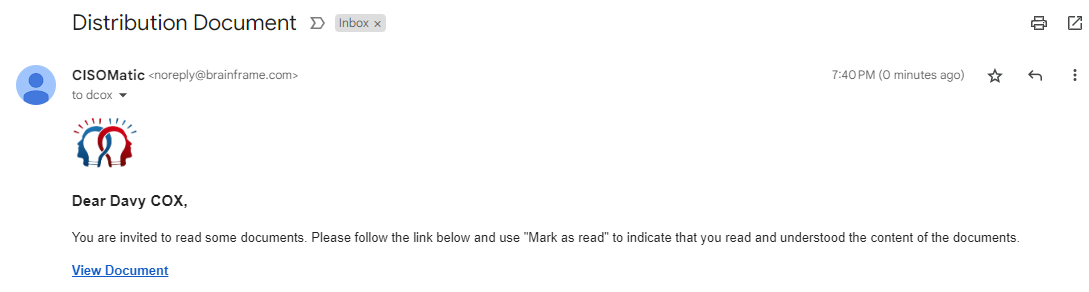
Example email (CISOMatic name will be name of distribution and Logo will be the one you configured in custom branding):