
Process management (workbench)
The biggest challenge in building and maintaining an effective management system, is the management and prioritization of work aligned with predefined processes. Using the workbench you'll find it easier to manage align process with what is actually happening
Checklists
Checklists are a special document type that will reside somewhere in your folder structure and offers a way to group tasks or documents that are part of a workflows/process together (e.g non-conformities, risks, GDPR related tasks, ...).
A checklist will by default use the todo/doing/done Kanban, but you can also assign custom Kanbans as described below
To create a new checklist, you have two options. You can do this from the Tasks/Workbench modules as shown in the image below.

TIP
Because checklists are documents that are created in the current active folder, you can simply move them into a dedicated "Checklists" folder where you have all checklists together. Using the document "Move/Link" button, you can even link the checklist to multiple folders (e.g. folder that describes a specific process).
ATTENTION
Checklists will only be visible to users that have read access to the folder containing the checklist document
Kanban
Our default Kanban type is called "General tasks" and will have simple Kanban stages (todo/doing/done) which will be preselected for any new Checklist you create. To align with complex processes and workflows you can also configure your own Kanban stages.
Here are some examples of popular checklists with different Kanban stages
- Employee lifecycle (recruitment, onboarding, training, up to date, role change/review, off-boarding, terminated)
- Non conformity and corrective actions (open, assessed negotiating solution, awaiting implementation, in progress, awaiting acceptance, resolved)
- Applicable legislation (Planned, To be reviewed, Managed)
- Incident management (Todo, Assess, Respond, Review & learn, Resolved)
- Supplier/Partner lifecycle (Pre-contract selection, Planned/review, Live, In renewal, Being decommissioned, Ended)
To create a new Kanbans, you have two options. You can do this from the Tasks/Workbench modules as shown in the image below.

This will open the following view

- The name of the Kanban that can be linked to a checklist
- The names of the Kanban stages
- The colors to represent the different Kanban stages (e.g. on timeline view, risks view, ...)
- The icons used to represent the different Kanban stages (e.g. on tasks view, ...)
- Depending on the Kanban stage, you can configure the amount of work remaining (5 -> 0), which is used in some modules to visualize progress (e.g. risks view evolution)
- Add additional Kanban stages
- Remove additional Kanban stages
INFO
A Kanban can also be configured from the Workspace settings page's dedicated menu "Kanbans". When you copy a checklist to another workspace, their corresponding Kanban will also be copied
Workflow/Process planning
Any document can be added to the workbench process management to facilitate the management and visualize multiple stages inside a process or workflow. Using the planning tab on any document or the "Add to workflow" button you can add any document to one specific checklist.
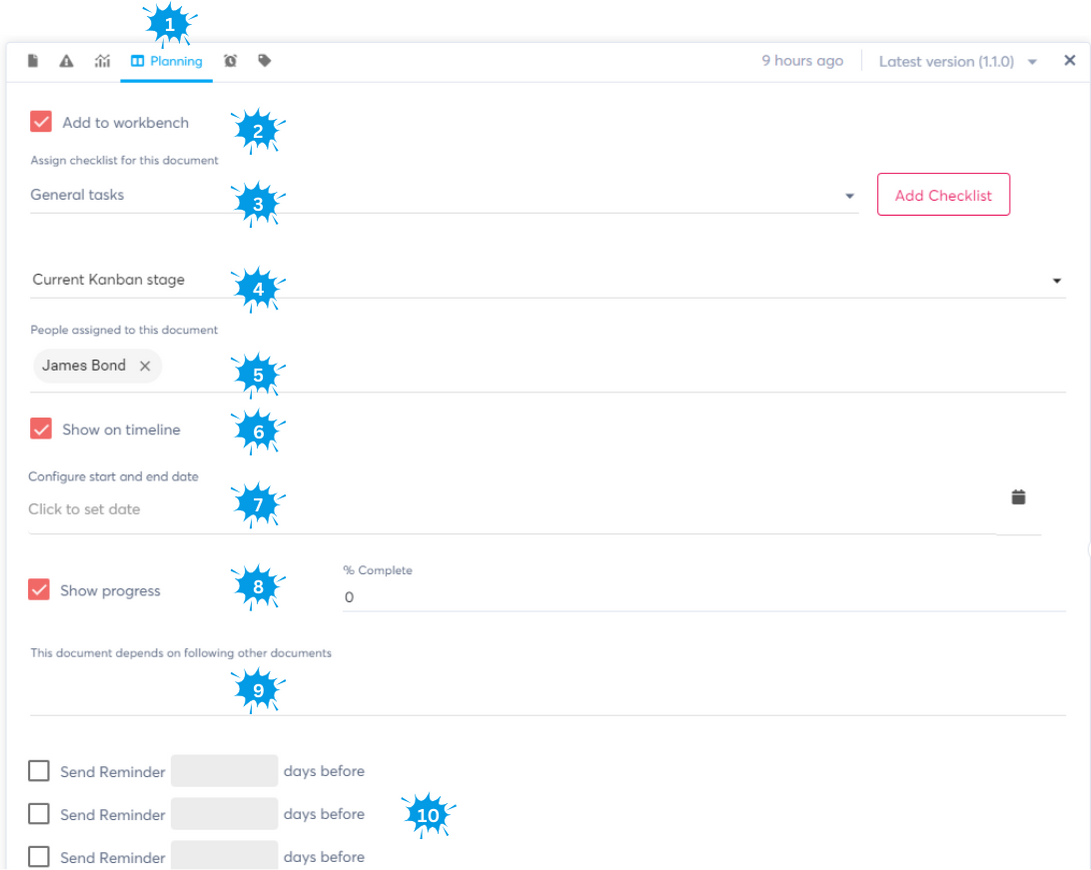
- By activating this checkbox, the current document will be added to the Workbench and the options below will be revealed
- Here you select existing Checklists to group your tasks per process/activity
- Here you specify the current Kanban stage of this document in the Checklist
- You can assign this document to one or more Brainframe users, which will be visualized on the cards on the Workbench
- Optionally you can activate timeline settings, which reveals the additional options below and shows the data on the Roadmap/timeline
- You can configure a FROM/TO date for which this activity is planned. (the TO date will automatically be shown as the deadline in the Workbench and will be considered as the finish date in the Risks future trend line)
- Optionally you can configure the progress of a document which will reveal the additional options below and define the actual % of progress (shown on timeline and on workbench)
- Here you can mark other documents on the same checklist as a dependency of the current document (Gantt)
- You can configure up to 3 levels of reminders based on the deadline configured in 7
TIP
Filenames that are written in bold in the folder content indicate that they are part of the process management workflow and have been added to a checklist
Workbench views
Overview
When you select the Workbench menu, you will be shown all existing Checklists in your workspace that you have access to. When you select a checklist, you will be presented with the Kanban view of that specific Checklist.
Pay attention that the workbench only shows content of the current folder (and subfolders). If you select the upper most folder (INBOX), you are sure to see all the content.

INFO
Notice that there is a small configuration button in the right bottom for each Checklist. By clicking on it, you will be redirected to the specific checklist document in your folder structure where you can modify the folder permissions to define who can see the checklists
Charts
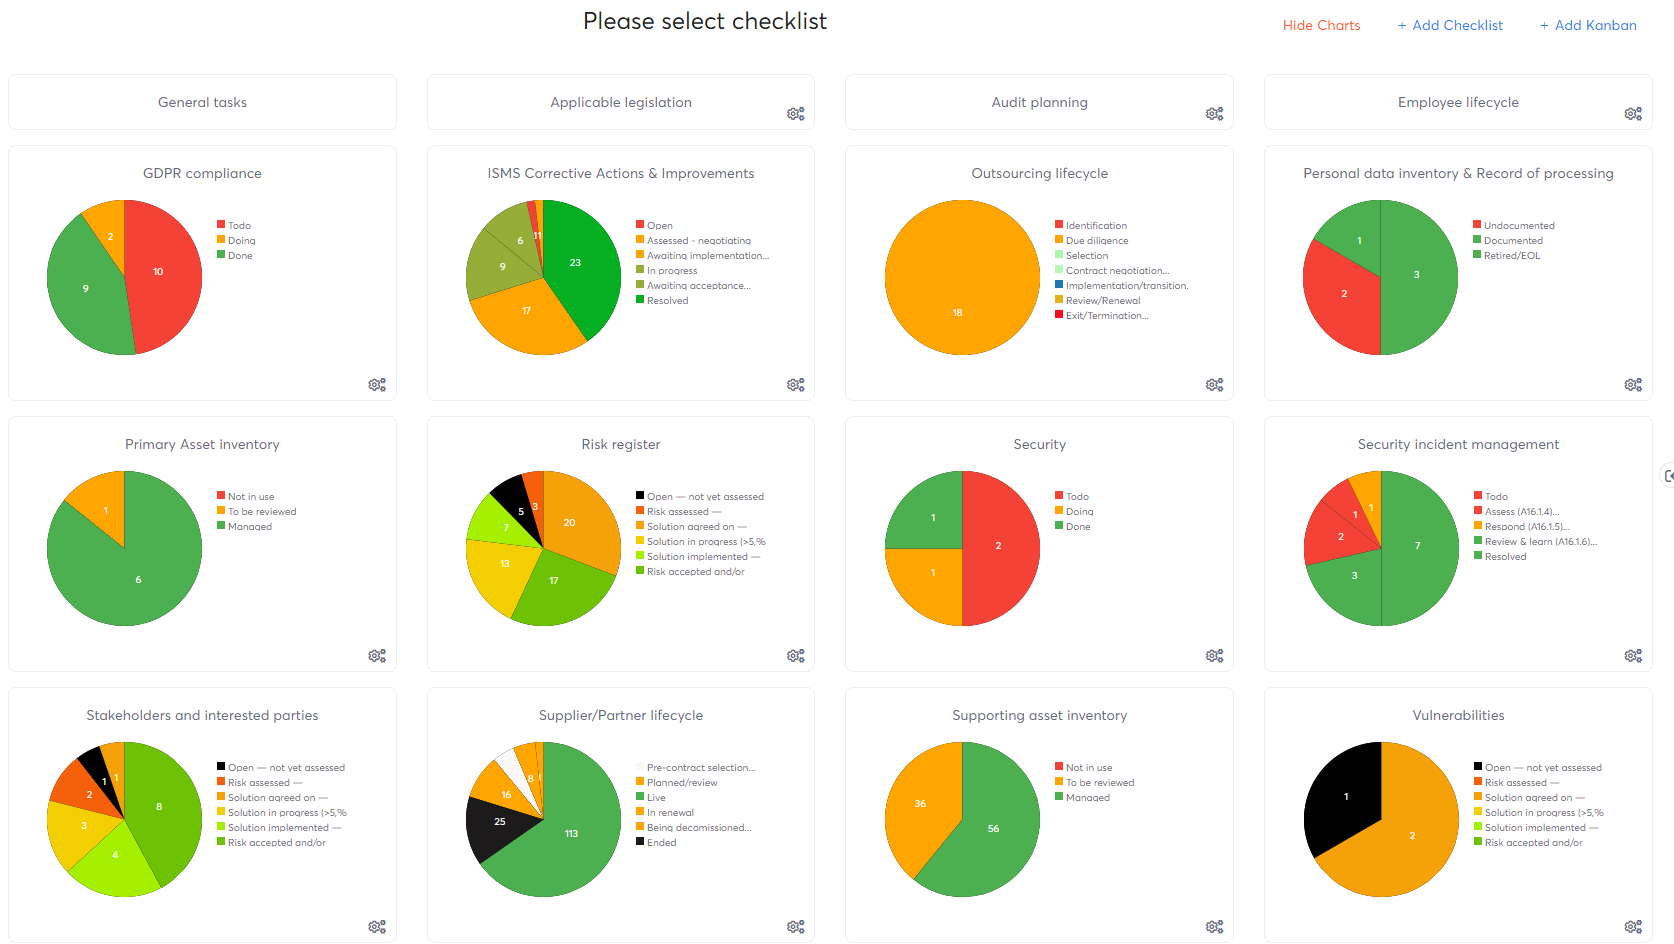
To get a quick view on the progress of all your Checklists you can click the "Show charts" button in the Workbench overview page, which loads a general overview of each Checklist and the different Kanban stages

When you have multiple checklists with items assigned to multiple Kanban phases, this will result in a reporting view similar to this:
INFO
For performance reasons the Charts always show the progress of the whole workspace, and is not folder hierarchy aware like the other views views
Kanban view
When you click on one of the checklists in the Workbench view, you will see the Kanban view representing the different assigned documents on their corresponding Kanban stages in columns next to each-other (Previously configured in the planning tab of a document). From here you can easily drag and drop cards (documents) from on stage to the other. By double-clicking on a card, it will open the document view in a popup view with the same functionalities as if you would open it from the normal folder content view
TIP
The Kanban remembers the order in which you vertically sort the cards, making it one way of prioritizing documents. Alternatively you can use the "Sort by deadline"
The Kanban view top menu gives you additional possibilities to define what data is shown (it is similar in the Tasks/Table view)

- Switch between Kanban/Table view for the workbench
- Using the checkboxes you can configure if you want to see subfolder content or not, sort the cards per deadline or show only tasks assigned to you
- When you have access to multiple workspaces, you can show cards of the same Checklists (with the same Kanban) all together on one view. It will reveal an additional badge on the cards with the Workspace name if it is different than the current one
- Here you can quickly filter on the unique identifier, name or person assigned to the cards
- This checkbox reveals risk details on each card if risk readings have been done
- Enable this checkbox to also load archived documents
- Here you can quickly select another checklist without having to go back to the overview screen
- This is the Kanban card list with your different stages. Simply drag/drop cards to another column to change its stage (If a risk reading has been done that depends on the Kanban stage, you will be asked if you also want to do a new risk reading.
When we look at one card of the Kanban view, you'll see all important details in one place
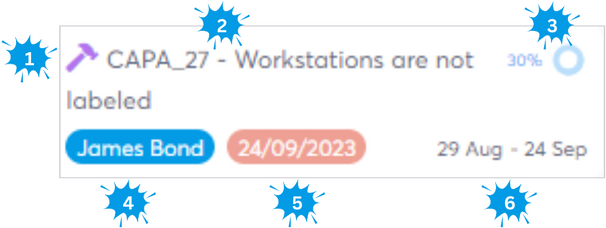
- Icon of the document type
- The optional unique identifier of the document and its name
- The progress configured in the timeline using the planning tab
- Badges of Brainframe users assigned to this document
- Deadline of this document (either the last date configured in timeline, or the reminder date configured on the document)
- The FROM/TO date configured on the timeline
CAUTION
Please remember that the workbench is folder hierarchy aware. This means that only document in the the current folder and subfolder that are part of this checklist will be shown. This is very practical when you structure your documents per product/service or per department, because it allows you to quickly see only the relevant items on the checklist.
Table view
This view represents the same data as the Kanban view but more in a Spreadsheet format.

- Select the table view of the workbench
- The column headers allow you to quickly filter on the specific data of that column
- Here you can configure which columns are shown and exported when you click on the Excel icon
INFO
If the exported Excel file gives a format error during the first time opening, please allow Office to auto fix the problem. It is related to special characters used in the table.